alright......here's the tutorial on how to applique a shirt.....but first i'll show u what i did to turn one of my old shirts into a shirt for my daughter..(if u're using a knit shirt like i did,, u'll need to put a ball point needle on ur machine first...and when sewing knit,, do not use a straight stitch,,it will not stretch when ur fabric does,,and so the thread will break ...i use a slanted zigzag stitch,,if u don't have one of those,, use a zigzag stitch)......first, i took a shirt of her's and laid it on top of mine......
then i used her shirt as a pattern, and cut around it.....making sure i cut up the top of the sleeves and down the bottom too...and leaving a 1/4 of a inch or so for an inseam when i sew the pieces back together....so u'll have two separate pieces...a front and a back.......the shirt i picked of mine to use had a cowl neckline,,,so i cut it down too....trying to make it as close in width as the one of hers i was using......
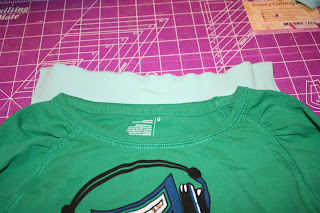
next u'll sew the two pieces back together,,right sides together of course!......so u'll sew from the neckline down to the edge of the sleeves on both sides...and from the bottom of the sleeves to the arm pit and down the side of the shirt.........since my shirt had a cowl neckline,, when i turned it right side out and folded the neckline over the way it's suppose to be,, i had an ugly raw edge,, like this.....
so to fix that i did a "french seam" just on the neckline,, to do this u take ur seam u want to fix, turn it inside out,, so u see the pretty seam on the other side....and pinch it like i did in this picture below,, and then sew a seam ....this will sandwich the raw seam into the middle of the pretty seam and the new seam........
now our shirt is done! try it on ur model to make sure it came out right.......and in case ur wondering,, i just cut the sleeves to fit...and left the seams raw....u can hem them if u want.......
now that we have our shirt to work with,, ( i love the fact i didn't have to buy one,, and i have one that is a little different then a regular old tee shirt)...we'll put an applique on it.......to do this u need whatever fabric u want to use,, and some "wonder under".(u can get this at ur fabric store, our walmart still has fabric,,and they carry it,, it's 1.99 per yard)..to applique, u'll actually be making ur own iron on...and then putting it on ur shirt.....say we're going to put a "circle" on the shirt.....i usually search thru my house until i find something that shape and the right size.....this time it was one of my chirstmas plates...lol....place the plate on ur wonder under,,,,i had just about the right size piece of wonder under left........ cut a piece bigger then what u need...........then cut a piece of the fabric out,, a piece bigger then the piece of wonder under u already cut...
....turn the fabric face down on ur ironing board,,,and then take ur wonder under........when u feel it in ur hands,, there's a wax paper side, and a rough side......place the rough side on top of ur fabric...and place the iron on the top of the wax paper side.......and iron ......
next, u can use ur pattern,, in this case it's a plate...trace around it and cute it out........and then u're going to peel the wax paper off of the fabric cut-out...sometime it can be a little hard to get started...but keep at it....
after u get it off,, center it where u want it on ur shirt,, and just iron it down....then stitch around ur design....a small zigzag looks best...unless u have an awesome VERY straight, straight stitch......and u're done!!!
yes, i messed up the peace sign.....i forgot the middle stick on the bottom!HA!,, luckily my daughter hasn't noticed yet!! lol.........i'll be posting a tutorial on adding ruffles to pre-made pants later.........and even if u think u know how to do that already,, i bet i have a trick to make it LOTS easier for u!!!
Park City Utah
3 years ago


1 comment:
Don't feel bad i did the same thing and she even had her school pics made in it!
Sonya
Post a Comment